
Your washing machine is leaking water from the bottom because water is escaping from one of the connections, hoses, seals, or components that sit at or below the level of the tub, and gravity is carrying it straight to the floor. The leak almost never starts at the floor itself. It begins somewhere above, travels down through the cabinet, and appears at the base, which is why a bottom leak can look like a single mystery when it actually has several very different possible sources.
Water on the laundry room floor is one of those problems that feels urgent in a way most appliance issues don’t, partly because of the mess and partly because of what a slow leak can do to flooring, subfloor, and in older Michigan homes, the framing beneath. The good news is that most washing machine bottom leaks come from a short list of causes, and the timing of the leak during the cycle narrows down which one it is before you’ve looked at a single part.
At Motor City Appliance Pros, we respond to washing machine leaks throughout Michigan every week. This guide covers every cause we regularly find, how to use the cycle timing to narrow down where yours is coming from, and what separates a quick fix from a job that needs a technician.
How Cycle Timing Tells You Where to Look
Before touching anything, pay attention to when the water appears. A leak that shows up the moment the machine starts filling points to a completely different problem than one that appears only during spin. The timing clue is often accurate enough to take you directly to the right component without having to check everything else first.
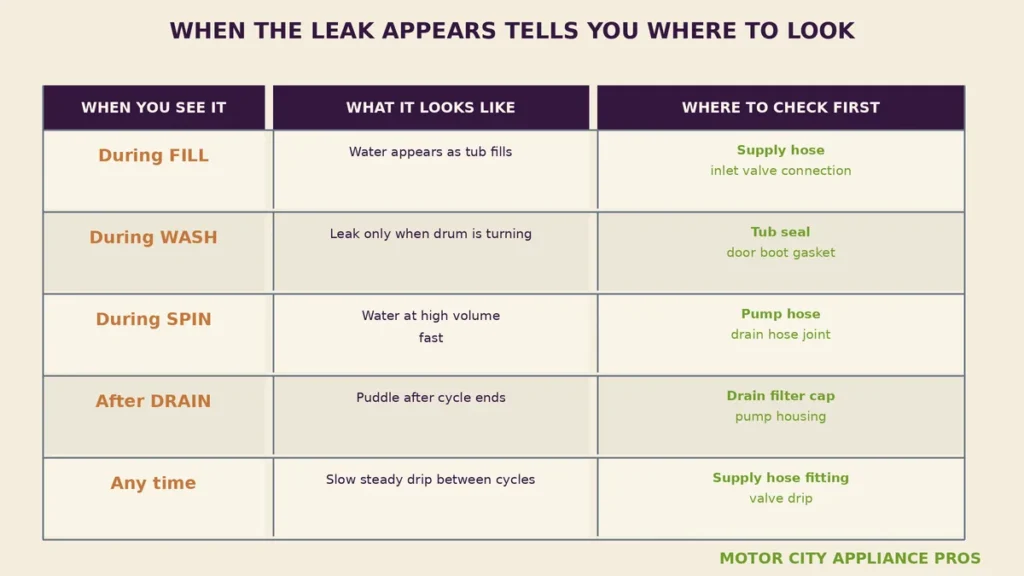
A leak during fill almost always points to the water supply connections at the back of the machine, either a loose fitting, a cracked hose, or a worn rubber washer inside the connection. A leak that only shows up when the drum is turning during the wash cycle points to the tub seal or, on front loaders, the door boot gasket. A high volume leak during spin is usually the drain pump hose or its clamp. A puddle that appears only after the drain cycle finishes often means the drain filter cap on a front loader isn’t seated properly. And a slow drip that appears any time the machine is on or even between cycles usually means a supply line fitting that’s not quite tight.
Start with this timing observation before anything else. It will save you time and help you explain the problem accurately if you do end up calling a technician.
The Drain Pump Hose
This is the most common cause of a bottom leak on both top load and front load washing machines. The drain pump sits near the base of the machine and is connected to the tub by a short hose held in place by a spring clamp or a screw clamp. These clamps loosen over years of vibration, and the rubber hose itself can crack or develop a small split, especially on older machines. When either happens, water that’s being pumped out during drain or spin finds an exit before it reaches the standpipe.
Accessing the pump hose usually requires pulling the machine away from the wall and removing either a front access panel or a bottom kick panel, depending on the model. On many machines you can see or feel the hose connection without removing anything other than the panel. Look for a wet ring around the clamp, mineral deposits or staining on the hose, or a section of hose that feels soft or spongy when you squeeze it. A loose clamp can often be reseated by hand or with pliers. A cracked hose needs replacing, and hoses are relatively inexpensive parts.
The Door Boot Gasket on Front Load Washers
Front load washing machines seal the door with a large rubber bellows, sometimes called the boot seal or door gasket, that stretches between the door and the outer tub. When this gasket tears, pulls away from its retaining ring, or develops a small hole, water that sloshes against the door during the wash and spin cycles finds its way out. On a front loader, this is usually the first thing to check after the pump hose.
The leak from a door gasket tends to appear during the wash or spin cycle and often shows as water running down the front of the machine and pooling at the base rather than dripping from underneath. Pull the gasket back gently and look inside the fold, that’s where tears usually begin, and also where mold tends to grow if the gasket stays damp between uses. Small tears are not always visible to the eye but can sometimes be found by running your fingers carefully around the fold.
Wiping the gasket dry after every load and leaving the door slightly open to air out the compartment significantly extends gasket life. Once a tear exists, however, the seal needs to be replaced. It’s a model specific part and involves removing the retaining spring and sometimes the door panel to install properly, which makes it a moderately involved repair but not a particularly expensive one on most machines.
The Water Supply Hose Connections
The two rubber hoses that run from the wall valves to the back of the washing machine are a frequent source of slow leaks that appear at the bottom because the water travels down the back of the machine before reaching the floor. These hoses have rubber washers inside each fitting that harden and crack with age, and the fittings themselves can loosen from vibration over years of use.
Checking these is simple. Pull the machine forward so you can see the back, then run a cycle and watch the fittings at both the wall and the machine end. A drip from the fitting, a wet ring around the threads, or a visible crack in the hose itself confirms the source. Hand tightening the fitting one full turn often stops a drip immediately. If the washer is cracked, replacing it takes five minutes and costs nothing. If the hose itself is aged, bulging, or has any visible surface cracking, replacing both hoses at the same time is standard practice since they have the same age and the same wear.
Stainless steel braided supply hoses are worth the small upgrade over plain rubber if you’re replacing them anyway. They resist cracking better and are less likely to fail suddenly in a way that floods the laundry room.
The Drain Filter Cap on Front Load Washers
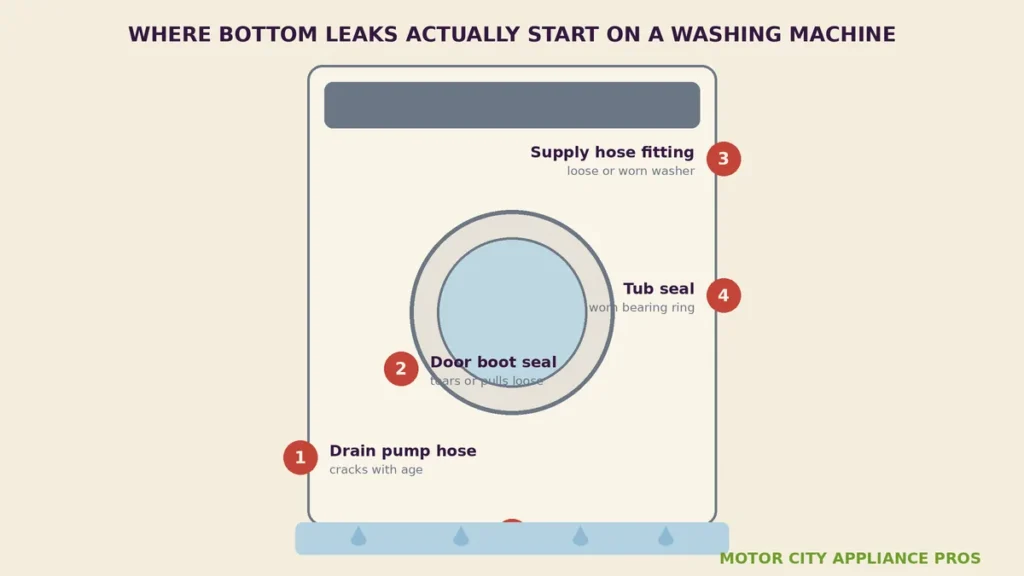
Most front load washing machines have a small circular access door near the bottom front of the machine, behind which sits the drain filter and a small drain hose. The filter is meant to be cleaned periodically, and the cap seals the housing closed. If the cap is cross threaded, not fully seated, or if the rubber gasket on the cap itself has deteriorated, water leaks from that point every time the machine drains.
This one is easy to diagnose because the leak appears right at the front base of the machine and only during or after the drain cycle. Open the small access door, confirm the cap is hand tight and seated evenly, and check whether the gasket on the cap is still in good condition. If the cap threads are damaged from repeated removal and reinstallation, the cap itself will need to be replaced.
The Tub Seal and Bearing
The tub seal sits where the drum shaft passes through the outer tub, and its job is to keep water inside the tub while the drum spins. When this seal wears out, water seeps through the shaft bearing and eventually makes its way to the bottom of the machine. A worn bearing often announces itself with noise first, a rumbling, grinding, or squealing sound during spin that’s louder than normal, before the leak becomes visible.
A tub seal failure is one of the more significant washing machine repairs because accessing the seal requires disassembling much of the machine. On many machines, especially older or budget models, the cost of the repair approaches or exceeds the machine’s current value, which makes this a good time to weigh repair against replacement. Our guide on whether to repair or replace a broken appliance in an older Detroit home walks through exactly that decision if you’re facing it.
Too Much Detergent
This one surprises people, but using more detergent than the machine is designed for creates excess suds that the machine can’t manage. Those suds escape through vents and seals that are not designed to hold foam under pressure, and the resulting water and soap mixture drips or runs down to the floor. It shows up most often on front load machines with HE ratings, since HE machines use significantly less water and are especially sensitive to over sudsing.
If the water on the floor is soapy or foamy, or if you can see suds inside the drum after a cycle that used more detergent than recommended, this is likely part of the cause. Switch to a proper HE detergent if your machine requires it, and use only the amount specified on the package. Run a clean cycle with no detergent to flush excess soap out of the system and see if the leak stops.
Top Load Versus Front Load: What’s Different
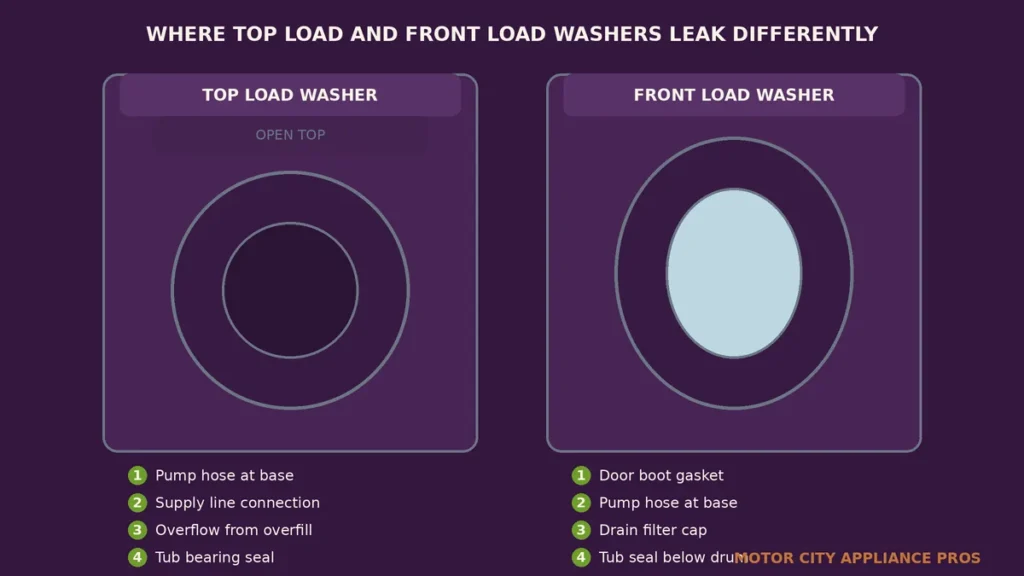
The causes of a bottom leak differ enough between machine types that it’s worth knowing which type you have before working through the checklist. Front load machines have a door boot gasket that top loaders don’t, and their drain filter sits at the front bottom where it’s accessible without tools. Top loaders have an agitator shaft seal that front loaders don’t, and they’re more prone to overflow leaks from detergent over sudsing because of how they agitate.
Both types share the supply hose connections, the drain pump hose, and the tub seal as possible sources. If you have a front loader, check the boot gasket and the drain filter cap early in your process. If you have a top loader and the machine is more than eight or ten years old and you’ve noticed a rumbling sound during spin, the tub bearing seal is worth checking before assuming the cause is simpler.
Michigan Homes and Why This Problem Shows Up More Often
Hard water across much of Michigan leaves mineral scale inside hoses and fittings over time. That scale makes rubber washers stiffer and more prone to cracking, and it can build up inside the drain pump in ways that force it to work harder and generate more heat near its connections. If your water is noticeably hard, adding a water softener or at least using washing machine cleaner tablets monthly slows this process considerably.
Michigan winters also play a role in laundry rooms that sit on exterior walls, in basements with poor insulation, or in utility spaces that don’t stay fully heated. Rubber hoses and gaskets that repeatedly cycle from very cold to warm expand and contract more than they’re designed to, accelerating the cracking and seal fatigue that causes leaks. If your laundry room is in a cold corner of the house and you’re seeing more hose and gasket issues than you’d expect, improving the insulation around that space is worth considering alongside the appliance repair.
What to Do Right Now if You Find a Leak
The first step is to stop running the machine and turn off the water supply valves behind it. Even a small leak can become a significant floor damage issue if the machine runs through several more cycles while you investigate. Mop up standing water promptly, especially if your laundry room has a wood subfloor, since water that sits and soaks in causes damage that far outweighs the cost of the appliance repair.
Then note when in the cycle the leak appeared. If you can safely run the machine for a short test while watching from a safe distance, do that once and observe carefully. Bring a flashlight and look under and behind the machine as it runs to try to see where water first appears. This observation, timed to the cycle, is the most useful information you can bring to a technician if you need to call one.
When to Call a Technician
Supply hose tightening, drain filter cap reseating, and detergent corrections are all things any careful homeowner can do safely. Replacing a cracked drain pump hose or a supply hose is a manageable DIY task if you’re comfortable pulling the machine and removing a panel. The door boot gasket on a front loader and anything involving the tub seal or the pump itself are more involved and are worth leaving to a professional.
Our washing machine repair technicians carry the common pump hoses, boot gaskets, and supply lines for the most popular brands and can typically diagnose and repair a bottom leak in a single visit, with a 90 day warranty on the work. If your dryer is also acting up, our dryer repair team can look at both machines at the same appointment rather than scheduling two visits.
In the southeast Michigan suburbs, our Southfield appliance repair team handles same day laundry calls throughout Oakland County. Further east, our Macomb appliance repair technicians cover Macomb County on the same terms with the same warranty.
So, why is your washing machine leaking water from the bottom? Because water is escaping from a hose, a seal, a fitting, or a cap somewhere between the tub and the floor, and the cycle timing tells you which one to check first. Start there, work through the list, and most bottom leaks resolve without needing a new machine.
Frequently Asked Questions
Is it safe to keep using a washing machine that’s leaking a little?
No, not if the leak is ongoing. Even a small leak can damage flooring and subfloor material if the machine runs repeatedly, and a leak that starts small often gets worse as the faulty part deteriorates further. Stop using the machine, turn off the supply valves, and identify the source before running another load.
How can I tell if the leak is from the front or the back of the machine?
Pull the machine away from the wall so you can see both the front and the back. Run a short cycle with a flashlight and look for where water first appears. Supply line drips come from the back. Drain filter and door gasket leaks come from the front. Pump hose leaks can appear from either side depending on the layout of the model, but they’re usually visible underneath or at the base.
Can too much detergent really cause a leak?
Yes, especially on front load washers labeled HE. Excess suds build up pressure that forces foam and water through seals and vents not designed to hold it. If the water on your floor has any soapy or foamy quality, cut your detergent amount in half and switch to an HE formula if you haven’t already.
How often should I replace the supply hoses on my washing machine?
Rubber supply hoses are generally recommended for replacement every five years, or at any sign of cracking, bulging, or visible surface deterioration. Stainless steel braided hoses have a longer service life and are worth using as a replacement. If you’re replacing one, replace both at the same time since they have identical age and wear.
What does a tub seal leak sound like before it becomes visible?
A worn tub bearing, which usually fails alongside the seal, produces a rumbling, growling, or grinding sound during the spin cycle. It’s louder than the normal spin noise and gets progressively worse over time. If you’ve been hearing an unusual spin noise for a while before the leak appeared, the tub seal and bearing are the most likely culprits.
Can I replace a door boot gasket myself?
It’s possible on many front load models, but it involves removing the retaining spring, sometimes the front panel, and stretching the new gasket carefully into position without tearing it. Having the correct replacement part for your exact model number is essential. If you’re comfortable with appliance disassembly and have some patience, it’s a doable repair. If not, it’s a good one to leave to a technician since a misinstalled gasket will simply leak again.